Bài đăng

Script jenkin

 String[] excludes = [     ".idea",     ".vscode", ".git", ".env" ] def document_root = "/var/www/v4-api.hidemium.com" def document_dashboard = "/var/www/v4-dashboard.hidemium.com" def exclude_file = "/tmp/ssh-webhook.txt" def git_url = "http://git.minhhoangjsc.com:8080/web-projects/multiple_browsers" def git_branch = "V4" def git_creds = "aa0c901d-965f-4edc-a3dd-d5f391f66247" def loop_of_sh(list,tmp) {     list.each { item ->         sh "echo ${item} > $tmp"     } } def ex(param){     currentBuild.result = "ABORTED"     error("Error: " + param) } pipeline {     agent none     stages {         stage("Deploy V4-API") { parallel { stage('v4-webservices') { agent { label 'v4-webservices'} steps { echo "Pulling code" git branch: "$git_branch", credentialsId: "

Gỡ mysql và cài lại

Hình ảnh
sudo apt-get remove --purge mysql* sudo apt-get purge mysql* sudo apt-get autoremove sudo apt-get autoclean sudo apt-get remove dbconfig-mysql gỡ mysql nha bạn systemctl stop mysql apt-get purge mysql-server mysql-client mysql-common mysql-server-core-* mysql-client-core-* rm -rf /etc/mysql /var/lib/mysql Remove MySQL configuration and data apt autoremove KHI LỖI MYSQL CÓ THỂ FORCE RUN ĐỂ BACKUP DATA innodb_force_recovery = 4 

Cách triển khai ứng dụng nextjs lên ubuntu

Tham khảo How to deploy NextJS app on Ubuntu 22.04 | BRDN Sử dụng nginx fastpass proxy ứng dụng nextjs được mở bởi pm2 How to deploy NextJS app on Ubuntu 22.04 In this article I’ll show how to deploy NextJS app on Ubuntu 22.04. NextJS allows to create fast, SEO-optimized ReactJS apps with easy configuration. More on NextJS: - https://youtu.be/Sklc_fQBmcs - https://youtu.be/BILxV_vrZO0 Env: Ubuntu 22.04 NodeJS 14 NPM 6 NextJS 12.1.6 Initial server setup When you create a new Ubuntu server, you should make initial setup to increase security, and to make interaction with the server more comfortable. Access the server using root user ssh root@server_ip   ssh  is a utility for remote intercation with the server. root  is a default user that created in Ubuntu. It has all privileges and can make destructive changes to the system. Under  root  you can delete important system files, etc. So, it’s reasonable to create a user with shortened privileges for day-to-day administrative tasks. server_i

Tìm ra ip truy cập nhiều theo file log cloudflare

awk -v d1="$(date --date '-10 min' '+%d/%b/%Y:%T')" '$4 > d1' /var/log/nginx/multibrowser_v2_main-access.log |  awk '{print $1}' | sort | uniq -c | sort -n | tail -10

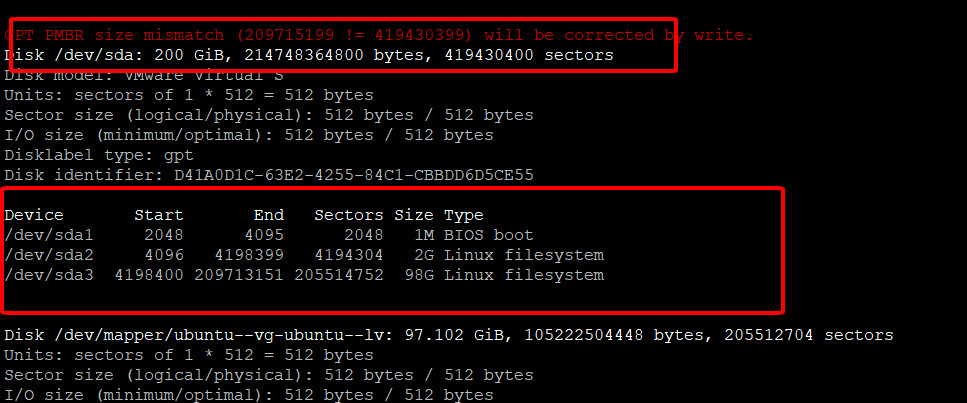
Chia thêm disk cho ubuntu trên vmware

Hình ảnh
 bạn fdisk -l để xem nó có dư disk ko rồi thấy bạn tăng dung lượng vào đúng disk sda thì vào phân vùng dung lượng disk mới partprobe -s để scan lại disk nó sẽ ra cái /dev/sda4 tạo Physical volume: pvcreate /dev/sda4 vgdisplay show Volume group vgextend ubuntu-vg /dev/sda4 tạo Volume group lvdisplay show cái Logical volume để lấy cái LV path lvextend /dev/ubuntu-vg/ubuntu-lv /dev/sda4 extend sử dụng lvextend command resize2fs /dev/ubuntu-vg/ubuntu-lv nữa là ok

Các cách fix mongodb khi bị lỗi

Hình ảnh
Cách 1: repair  Firstly, stop mongodb if you restarted: sudo systemctl stop mongod Next, I detected the database corruption: sudo mongod --repair --dbpath /var/lib/mongodb Run commands: chown -R mongodb:mongodb /var/lib/mongodb chown mongodb:mongodb /tmp/mongodb-27017.sock Finally: sudo systemctl start mongod Cách 2: chưa làm thanh cong bao gio sudo kill $(sudo lsof -t - i : 27017 ) sudo rm -rf /tmp/mongodb- 27017. sock sudo rm -f / var /lib/mongo/mongod. lock sudo rm -f / var /run/mongodb/mongod. pid sudo mkdir -p / var /run/mongodb/ touch / var /run/mongodb/mongod. pid sudo chown -R mongodb :mongodb / var /run/mongodb/ sudo chown mongodb :mongodb / var /run/mongodb/mongod. pid Cách 3: gỡ đi cài lại https://narendrapalach1.medium.com/how-to-fix-mongod-service-6b473f842c5a